


We assume that you already have an active Google Ads account. If not check here
Before you start
- Make sure conversion tracking is set up or at least planned. If you can, set it up first, then build the campaign. (Google Help)
- All industry average conversion rate on Google Search Campaign is about 3.7 percent in 2025 roundups.
- Typical good Search Campaigns CTR range 4 to 6 percent, varies by niche.
Step 1: Start a New Campaign
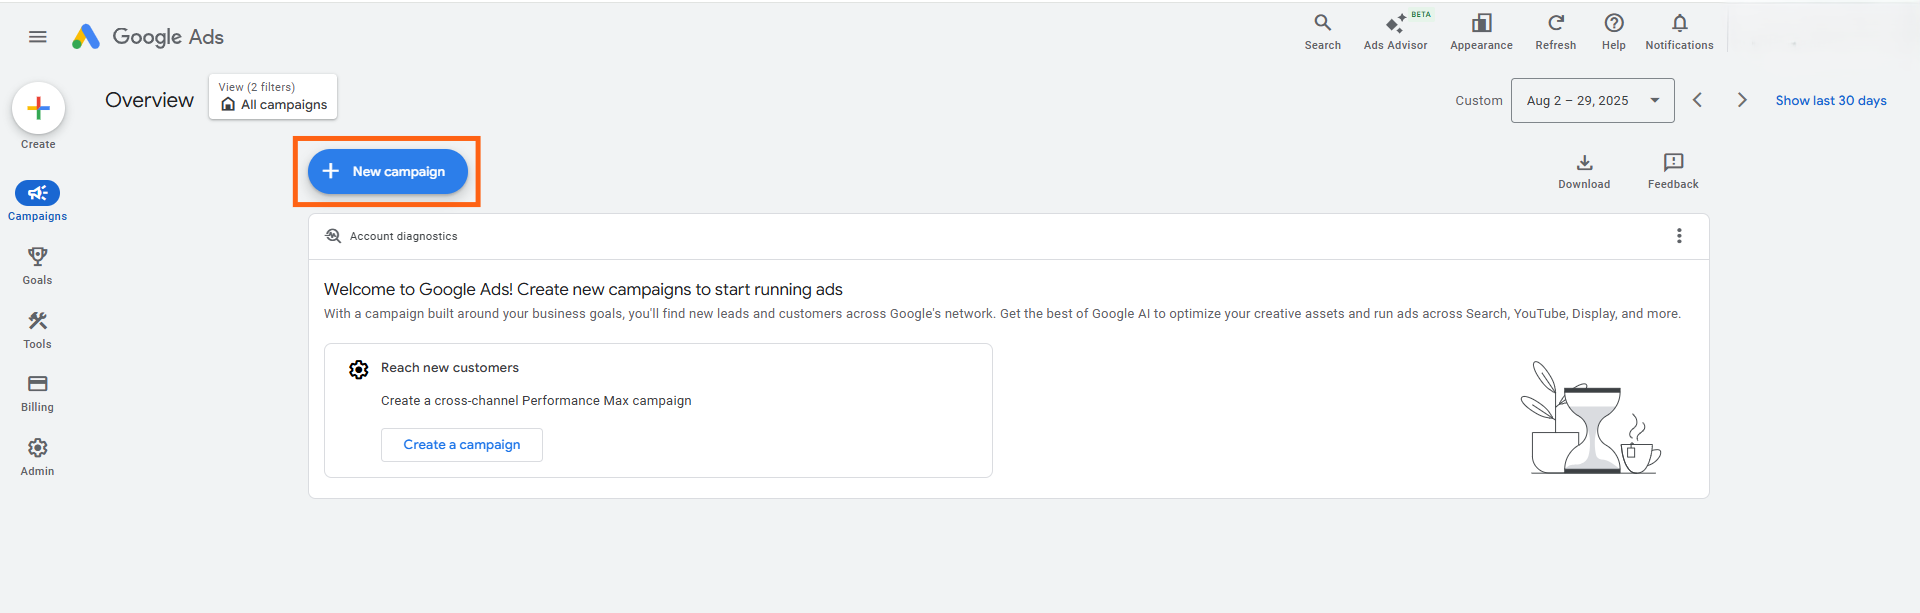
- Sign in to your Google Ads account (if you’re not already signed in).
- In the left-hand navigation menu, click the Campaigns section.
- Click the
 and select New campaign.
Step 2: Choose Your Campaign Objective
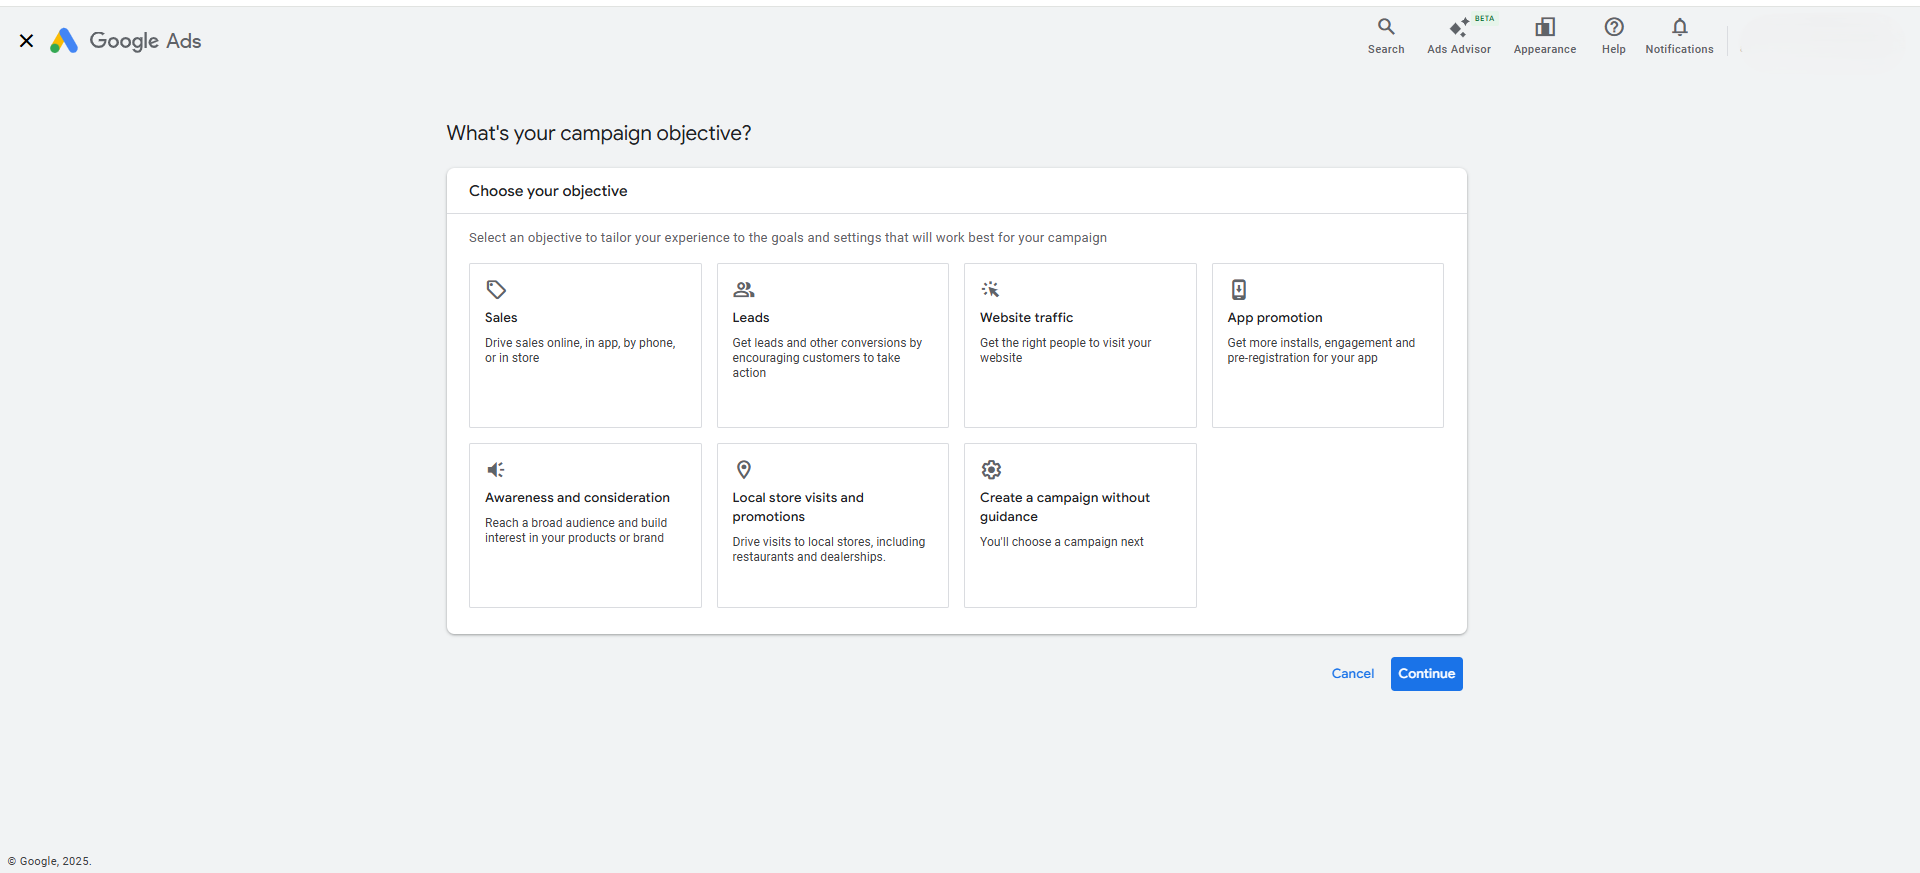
- Google will first ask you to select a goal that would make this campaign successful for you. Common choices for Search campaigns include:
- Sales: Optimised for driving purchases.
- Leads: Optimised for capturing customer contact details (e.g., form submissions, phone calls).
- Website traffic: Optimised for getting relevant users to visit your site.
- Alternatively, you can select ‘Create a campaign without a goal’s guidance‘ if you want full control over all settings from the start.
- Select a Goal: For a new advertiser, selecting Leads or Website traffic is often a good starting point.
Kind Note: If you have not set up ‘Conversion Tracking‘ (e.g., tracking a purchase or a form submission), it is best to start with ‘Website traffic‘ or ‘Create a campaign without guidance‘ and use a ‘Clicks‘ bidding strategy until your conversion tracking is fully functional.
In case if you’ve chosen “Create a campaign without guidance”
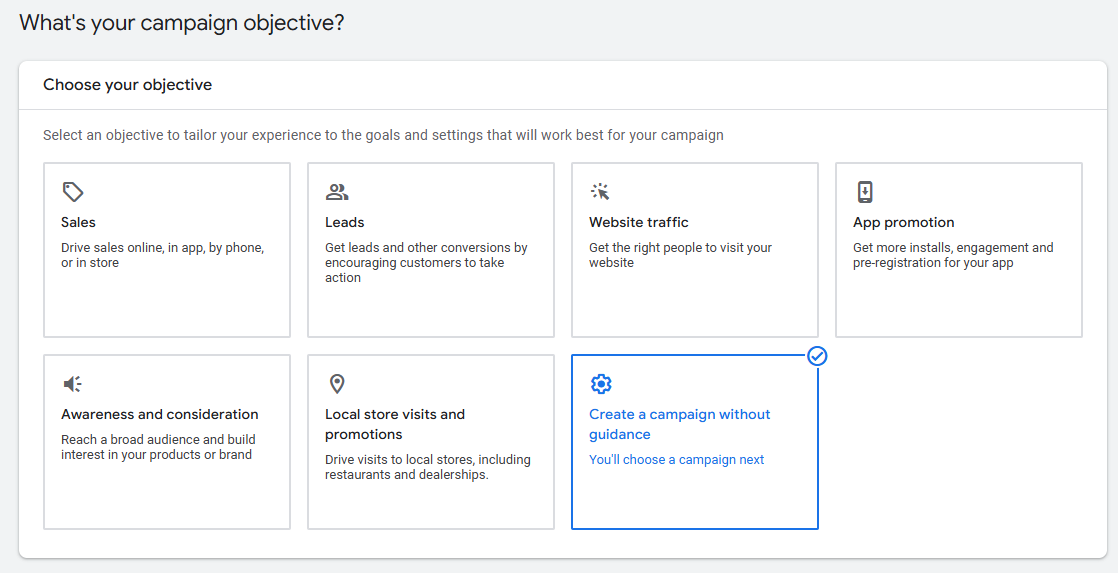
3. Choose the Campaign Type: Under ‘Select a campaign type‘, select Search.
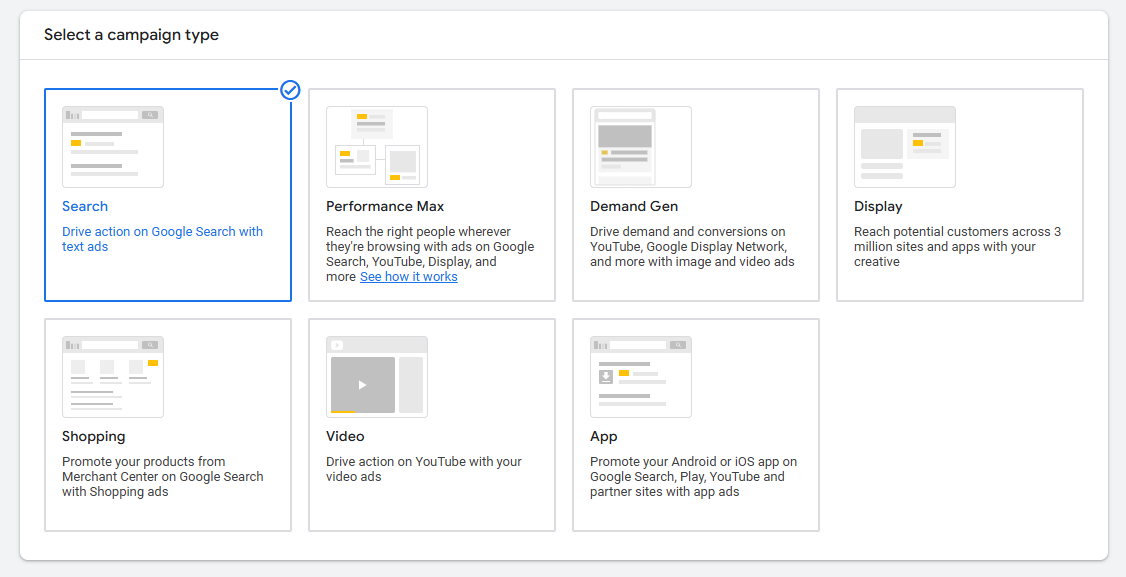
3. Click Continue.
4. Select the ways you’d like to reach your goal: You will be given options to select the specific conversion goals for your search campaign. After selecting your preferred conversion goal.
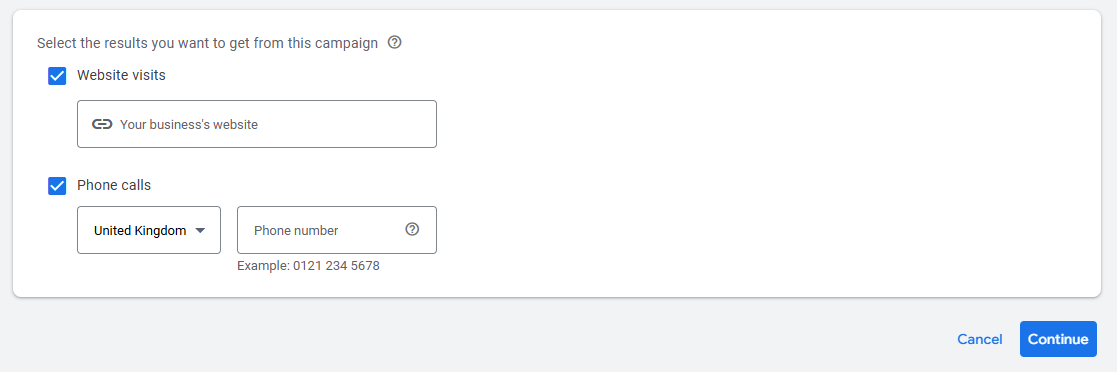
6. Click Continue.
Step 3: Configure General Campaign Settings
- Campaign Name: Give your campaign a clear, descriptive name.
- Tip: A good naming convention is essential for organisation, e.g., Search – UK – Product Category – Max Conversions.
- Bidding: This determines how you pay for clicks or conversions.
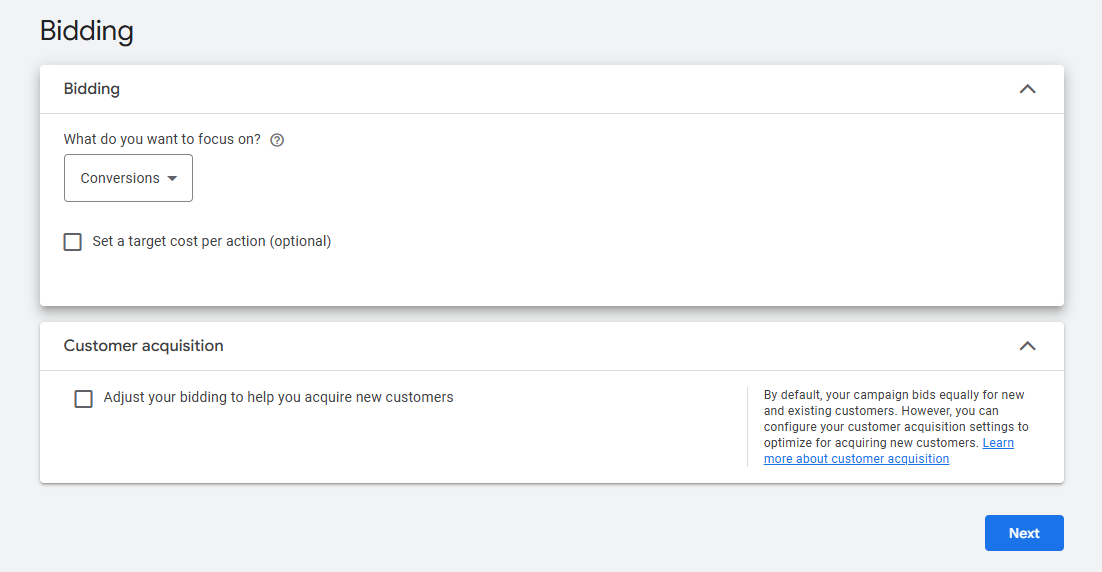
- What do you want to focus on?
- Conversions (Recommended): If your conversion tracking is set up, choose this. Google’s Smart Bidding uses machine learning to get you the most conversions for your budget.
- You can tick ‘Set a target cost per action (optional)‘ to tell Google the maximum you’re willing to pay for a new lead or sale (your Target CPA).
- Clicks: If your conversion tracking is not set up yet, choose ‘Clicks‘ and set a ‘Maximum cost-per-click bid limit’ to control your spend.
- Conversions (Recommended): If your conversion tracking is set up, choose this. Google’s Smart Bidding uses machine learning to get you the most conversions for your budget.
- Tip: Start with ‘Clicks‘ and a low Max CPC if you have little data. Once you have at least 15-20 conversions in the campaign, switch to ‘Maximise Conversions‘ for best results.
- Customer acquisition
Directly below your main Bidding settings, you will see a section titled Customer acquisition. This feature allows you to tell Google whether you want to focus your budget on finding entirely new customers versus existing customers who are already in your system (e.g., in a remarketing list).- Adjust your bidding to help you acquire new customers: By default, it is unticked. When unticked, Google bids equally for new and existing customers based on your conversion goal.
- Ticking the box: By ticking this box, you unlock two key strategies:
- Use the “Maximize conversion value” bid strategy: This is the required move if you want to bid more for new customers. This strategy aims to get the highest total conversion value (e.g., the total revenue from sales) within your budget. It requires you to be passing a monetary value back to Google Ads for every conversion.
- Set a target return on ad spend (optional): By ticking this box, you switch to the Target ROAS strategy. You tell Google the percentage return you want.
- Target ROAS (%): What to Enter: This is your target ‘Return On Ad Spend‘. For example, if you want to make £4 in revenue for every £1 you spend on ads, you would enter 400%.
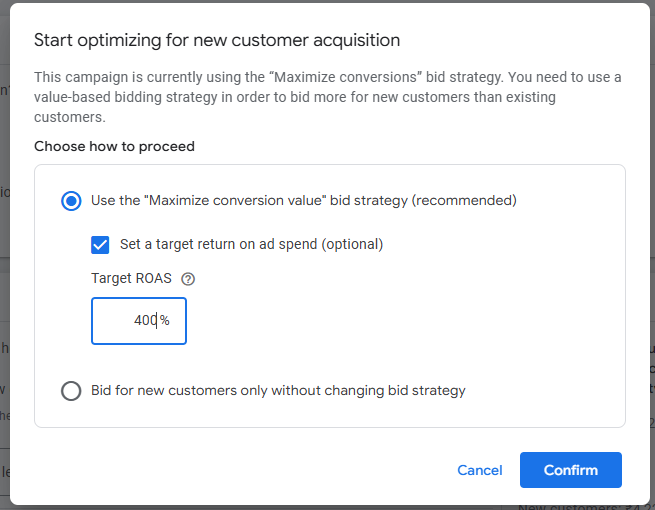
4. Only Bid for New Customers: This is the alternative option. If you do not have conversion values set up, you can select this. Google will then stop bidding for any existing customers. This is a very aggressive strategy and is best used if your primary goal is rapid expansion into new audiences, regardless of the higher cost.
Tip: For most UK businesses tracking sales (e-commerce), you should choose ‘Use the “Maximize conversion value” bid strategy‘ and ideally set a Target ROAS that reflects your profit goals. You must ensure your conversion tracking is passing back the correct value for each transaction before using this. A typical Target ROAS goal for a profitable e-commerce business ranges from 250% to 500%, depending on their profit margins. You must know your numbers to set this accurately.
3. Networks: This controls where your ads can show up.
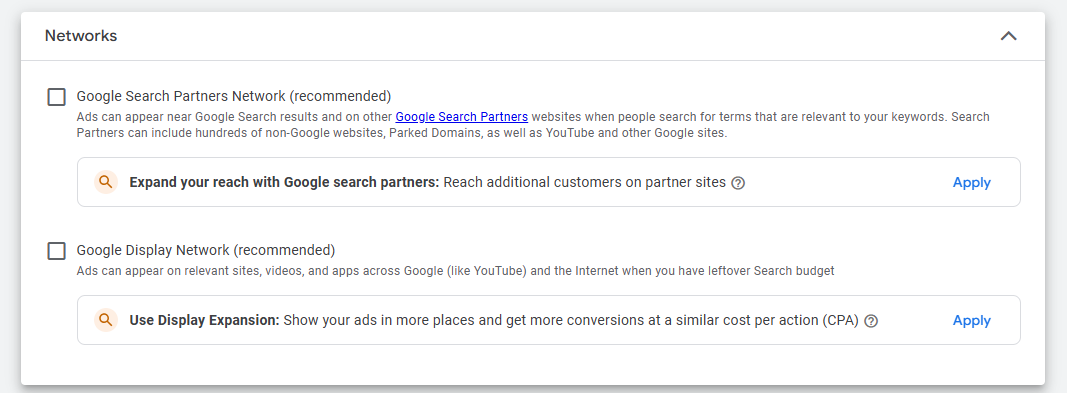
- Keep checked: Google Search Network (this is where your ads show up on Google search results).
- Opinion & Advice: Untick ‘Include Google Search Partners‘ and ‘Include Google Display Network‘ for now. Search Partners are often lower quality traffic, and you should run Display campaigns separately. By keeping only the Google Search Network, you focus your budget on the highest-quality searches.
4. Locations: Define your target audience’s geographic location.
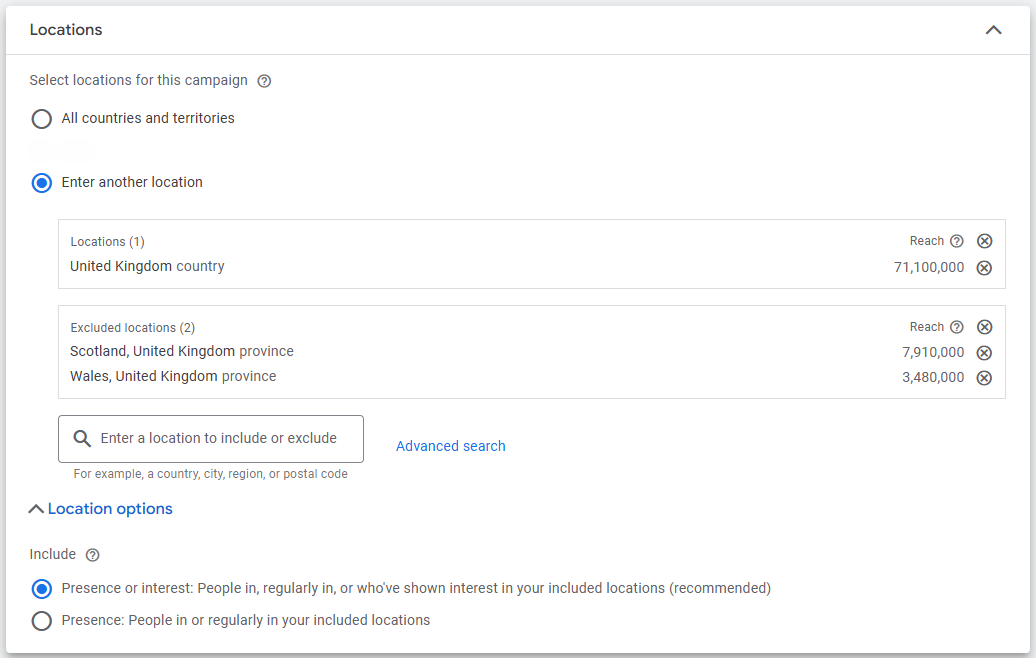
- Enter the location(s) you want to include (e.g., ‘United Kingdom’ or ‘London’).
- Enter the location(s) you want to exclude (e.g., ‘Scotland’)
- Location Options: Click this link and select the option:
- ‘Presence: People in or regularly in your targeted locations’ – This is generally the best and most accurate option.
- Note: Avoid ‘Presence or interest’ as it can show your ads to people outside your area who are just searching for something related to your area (e.g., someone in Spain searching for “London hotels”).
5. Languages: Select the language of the users you are targeting (e.g., ‘English’).
6. Important Regulatory Step: EU Political Ads: This section is a regulatory requirement imposed by the European Union. Google is legally required to ask this question for transparency and compliance, especially if your business targets users within the EU.
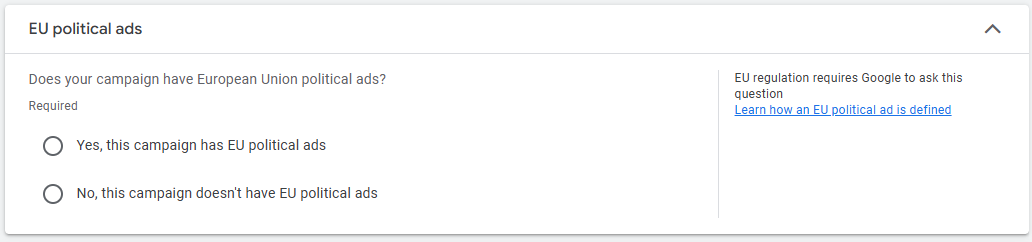
- EU political ads: “Required” You must select one of the two options to proceed with your campaign setup.This is non-negotiable; Google will not let you proceed until you select an answer.
- Yes, this campaign has EU political ads: You must select this if your ads are related to an election, a referendum, a political party, a political candidate, or an elected official in an EU member state. Selecting ‘Yes’ triggers additional verification steps and requirements for transparency in advertising.
- No, this campaign doesn’t have EU political ads: You should select this if your campaign is for a standard commercial purpose, such as advertising a product (like plumbing services), a non-political service, an e-commerce website, or any business-to-business (B2B) service.
- Action Required: For almost all businesses setting up a standard search campaign (like selling clothes, repairing boilers, or offering consulting services), you should select ‘No, this campaign doesn’t have EU political ads’.
7. Audiences Segments: Before you choose any audience, you must select how the segment will be applied. For Search campaigns, Observation is the recommended default. There are two options;
- Targeting: Narrows your reach of the campaign to ONLY show ads to people who are in the selected audience segment AND search your keywords. Use this only for highly-specific audiences, such as a Remarketing list of past visitors, when you have a limited budget or a very specific ad message.
- Observation (Recommended): Does NOT narrow your reach. Your ads will show to everyone searching your keywords, but Google will track how people in the selected audience segments perform. This is the best choice for almost all Search campaigns. It gathers data on your most valuable customers, and Smart Bidding will use this signal to bid higher for them automatically.
- Search Tab: The ‘Search’ tab is a quick way to find any segment by typing in a name, interest, or product.
- Ideas: As you type, Google provides suggested audience segments based on the keywords in your campaign and what other advertisers in your industry are targeting.
- Recents: This shows you the segments you have recently added or used in other campaigns, making it easy to re-apply them.
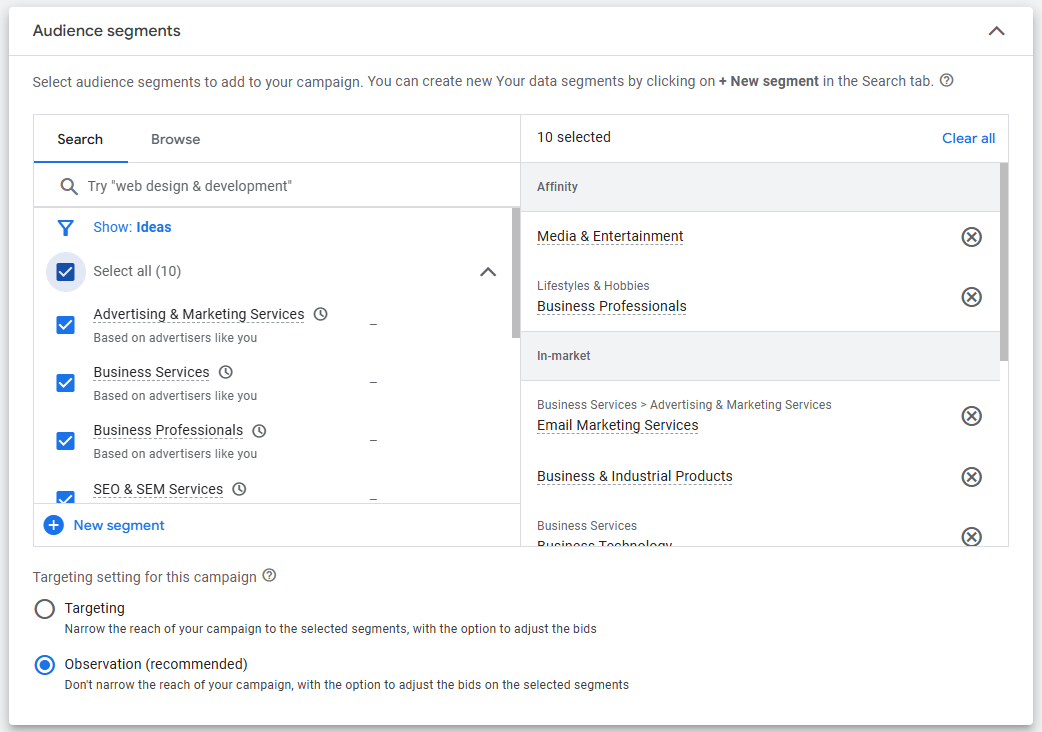
- Browse Tab: The ‘Browse’ tab groups Google’s available audiences into categories based on what Google knows about the user. Click the arrow (>) next to any category to expand and select the segments you want to add.
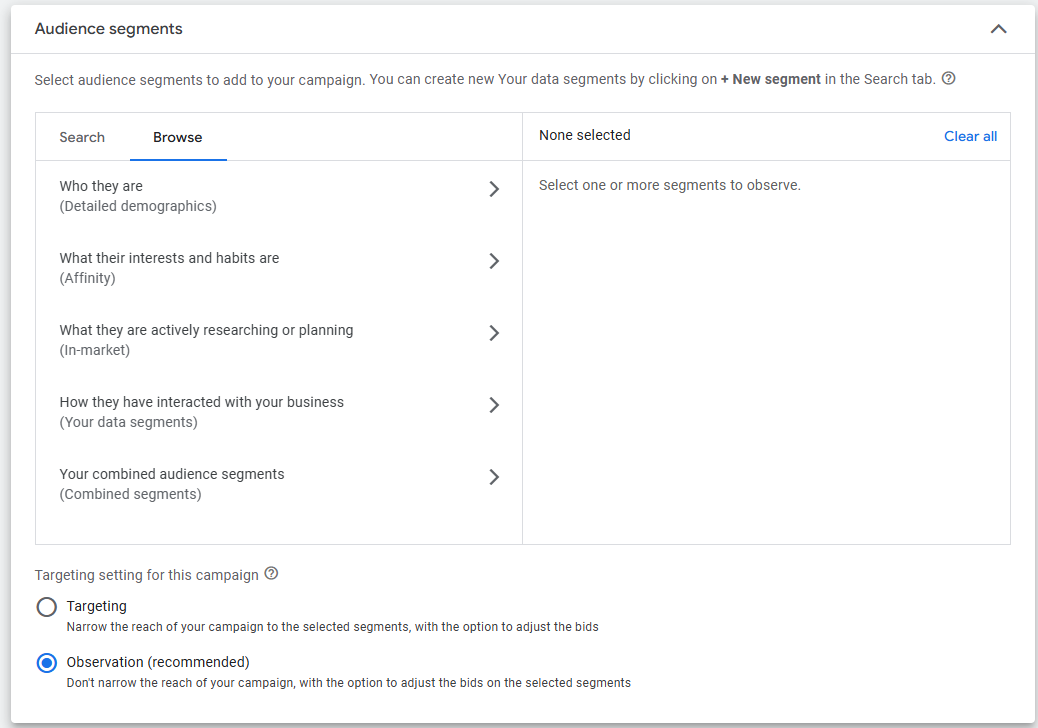
- Advice: Use Observation mode initially. This lets you gather data on how these audiences perform without restricting who sees your ads, allowing you to apply ‘Bid Adjustments’ later.
Step 4: AI Max
Google is heavily promoting the use of its Artificial Intelligence (AI) across all campaign types. The ‘AI Max for Search campaigns’ setting is how Google applies its most advanced automation to your standard text ad campaigns.
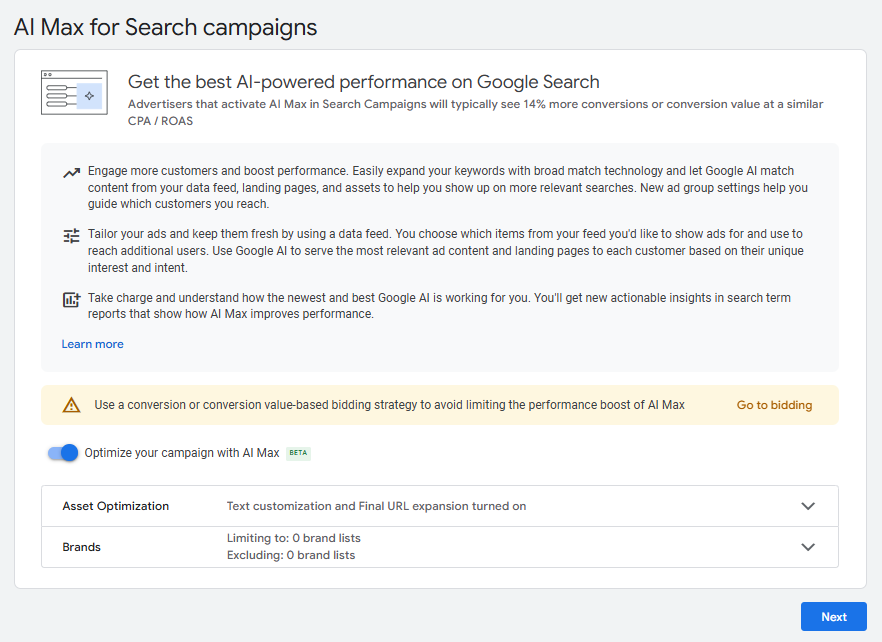
- Optimise your campaign with AI Max (Toggle): This toggle turns on a suite of advanced AI features that allow Google to expand your reach and automate ad creation beyond your exact settings.Recommendation: For maximum performance with Smart Bidding, you should generally leave this toggle turned on. It is Google’s push towards using Broad Match keywords and dynamic ad creation for better scale.
- Asset Optimisation: Text customisation and Final URL expansion turned on. This is the most expansive setting. Final URL expansion means Google may send users to a more specific, relevant landing page on your site than the main Final URL you set, based on the search query. Text customisation allows Google to auto-generate ad text to be highly relevant to the new landing page.
Start with this. The core benefit of AI Max is letting Google find the perfect landing page on your site for a specific query. If you have an e-commerce site with many product pages, this is highly valuable.
- Brands: This allows you to specifically tell the AI which brand terms to focus on (your own brand) or which brands to avoid targeting (competitors’ brands). Use for Control. If you want the AI to scale your non-branded (generic) campaign without bidding on your own name, you would add your brand name to an Exclusion list here. This keeps your generic campaign clean and focused on prospecting new customers.
Step 5: Keyword and Asset Generation
This is a new step that uses Google’s Generative AI to automatically scan your website and propose a complete, structured campaign setup, including keywords and ad copy (assets).
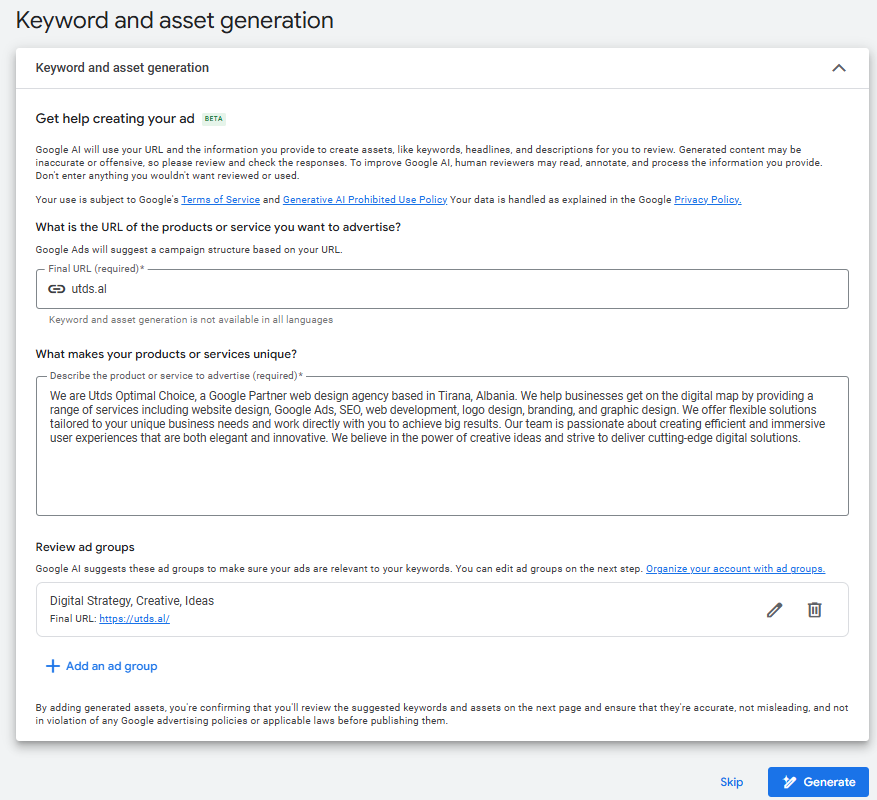
- Enter the Final URL: In the required field, enter the URL of the most relevant page on your website for this specific campaign.
- Example: If your campaign goal is selling a new jacket, use the URL for that jacket’s product page. If it’s a plumbing service, use the landing page for ‘Emergency Boiler Repair’.
- What the AI Does: Google’s AI will crawl this page to understand the products, services, tone of voice, and key selling points. It uses this information to suggest keywords and write ad copy that is highly relevant to the page content.
Generating Keywords and Assets
- Click the Generate button.
- The AI will analyse the URL and instantly provide suggestions. The next screen (which you will see after generating) will show:
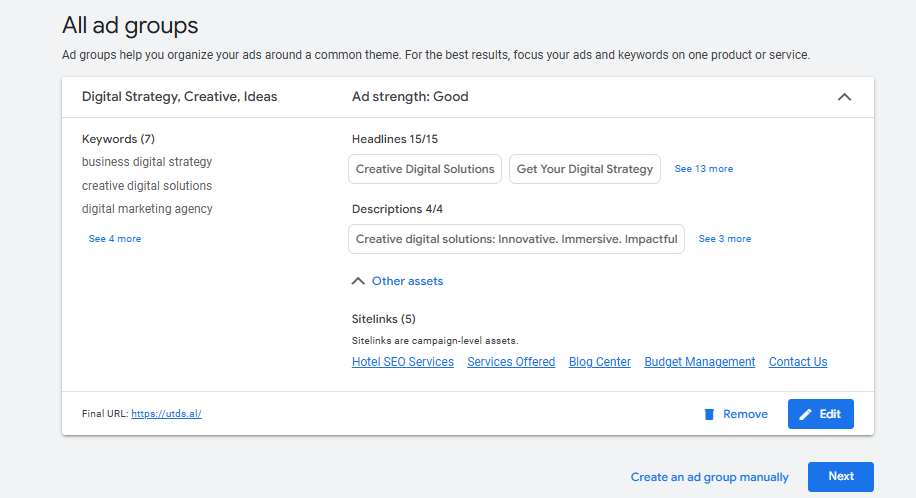
- Suggested Ad Groups: The AI will attempt to group your keywords into logical themes (e.g., ‘Emergency Plumbing’, ‘Boiler Service’, ‘Drain Cleaning’).
- Suggested Keywords: A list of relevant Broad, Phrase, and Exact Match keywords for each suggested Ad Group.
- Suggested Assets: A pre-populated Responsive Search Ad (RSA) for each Ad Group, complete with multiple headlines and descriptions generated directly from your website’s copy.
Opinion & Advice (How to Use AI Suggestions)
- Do NOT accept the suggestions without review. The AI is a great starting point, but it’s not perfect.
- Review and Refine Keywords: Check the suggested keywords for relevance. Crucially, remove any keywords that are too generic or those that are clearly for products/services you do not offer. Ensure you add relevant Negative Keywords later to avoid wasting spend.
- Review and Edit Assets: The suggested headlines and descriptions are a good baseline, but they can be generic. Always edit them to include your Unique Selling Points (USPs), specific prices or offers, and a strong, unique Call-to-Action (CTA) that the AI might have missed.
- Quality Score: The AI is designed to create a tight connection between your landing page, your keywords, and your ad text. This tight thematic structure is essential for achieving a high Quality Score.
Step 6: Set Up Ad Groups and Keywords
- Name Your Ad Group: Edit the name (e.g., “Ad group 1”) to something descriptive like ‘ADG – Emergency Boiler Repair’.
- Ad Group Keyword: This section is where you confirm or edit the keywords the AI suggested and define the boundaries for that Ad Group.
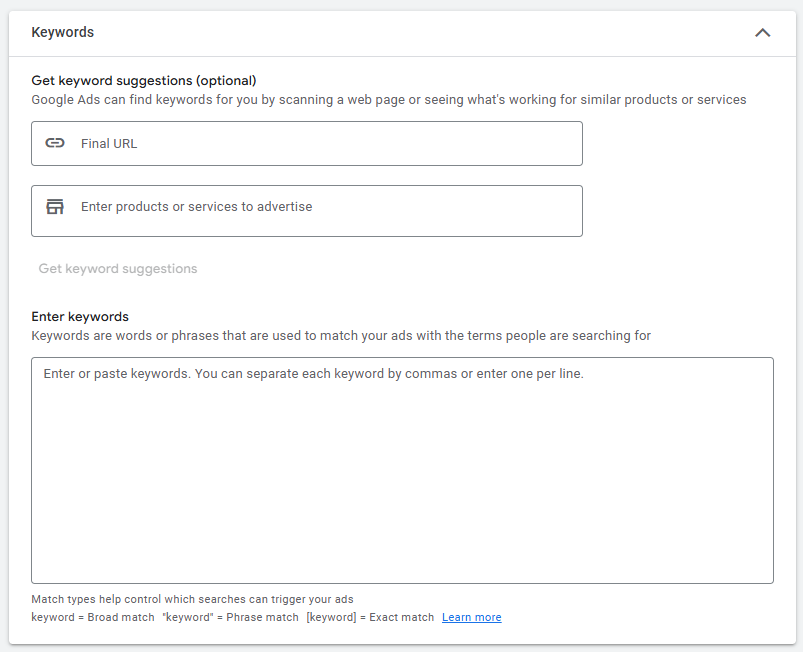
- Keywords: You can get keyword ideas by entering your product/service or website address.
- Review and Edit: Check the suggested keywords (which appear in the large text box after AI generation). Remove any that are clearly irrelevant.
- Match Types: Ensure you have a mix of match types. For a modern AI-focused campaign, a mix of Broad Match (for scale) and Phrase/Exact Match (for control and high-intent) is effective.
- Exact Match: [baxi boiler service] (Covers searches that are identical or have the same meaning).
- Broad Match (keyword) is best when paired with Smart Bidding and AI Max, as the AI manages the quality of the traffic.
3. Ad Group Settings for AI Max: (This only appears if you enabled AI Max at the campaign level).
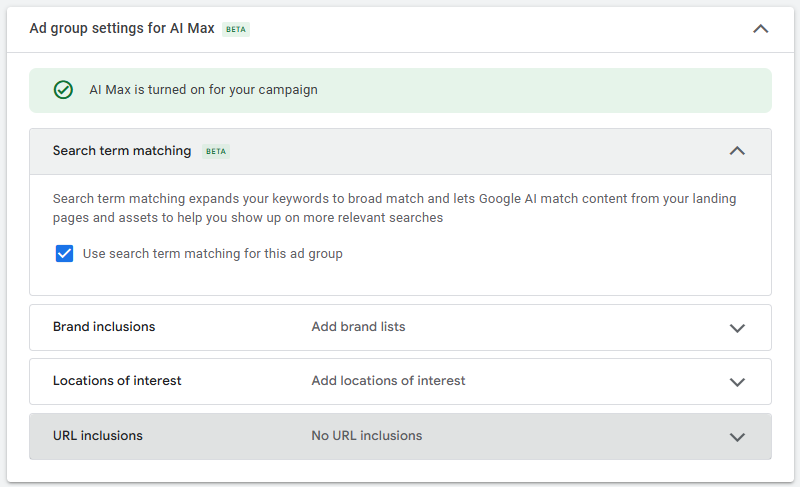
- Search Term Matching: This is on by default. You can choose to use search term matching for this ad group or turn it off if you want this specific Ad Group to only run on the keywords you manually entered.
- Brand Inclusions/Exclusions: If you need to include or exclude specific brand names for this Ad Group only, you can do so here (e.g., excluding your competitor’s brand for this ad group).
- URL Inclusions/Exclusions: You can specify certain pages on your website that the AI must use or must not use as a landing page for this Ad Group’s keywords.
4. Create the Responsive Search Ad (RSA): The RSA is the primary ad format and requires multiple text inputs for Google to test dynamically.
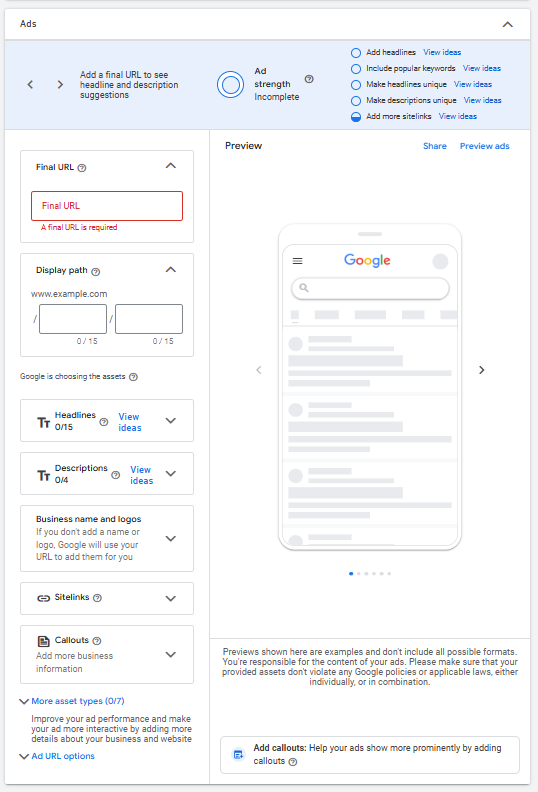
- Final URL: This is the specific landing page for this Ad Group (e.g., the exact ‘Emergency Boiler Repair’ page).
- Display Path (Optional): Add short, descriptive words that show in your ad’s display URL (max 15 characters each), like /Repair and /24-Hour.
- Headlines (Min 3, Max 15, 30 characters each):
- Goal: Aim for 10-15 high-quality, unique headlines.
- Mix Themes: Include headlines that feature your Keywords, your Unique Selling Points (USPs), and a clear Call-to-Action (CTA).
- Pinning: You can pin a headline to a specific position (1,2, 3) using the pin icon. Use pinning sparingly. Only pin critical assets like your Brand Name (e.g., to Position 1) or a Legal Disclaimer (e.g., to Position 2). Over-pinning reduces the AI’s ability to test and will lower your Ad Strength.
5. Descriptions (Min 2, Max 4, 90 characters each):
- Goal: Provide 4 unique descriptions.
- Use this space to expand on your offer, provide trust signals (e.g., 4.9 Star Rating), and reiterate your service’s benefits.
6. Ad Strength: Look at the ‘Ad Strength’ indicator in the top right. Aim for a ‘Good’ or ‘Excellent’ rating by adding more unique headlines and descriptions, and including relevant keywords.
- Stat: Advertisers who improve Ad Strength from ‘Poor’ to ‘Excellent’ see 12% more conversions on average.
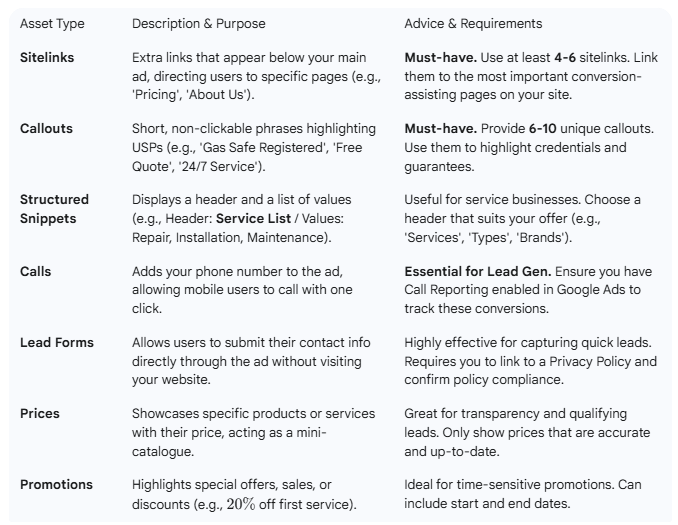
7. Add Assets (Formerly Extensions): Assets make your ad bigger, more relevant, and increase your Ad Rank, which lowers your cost. You should set up as many relevant assets as possible.
8. Ad URL Options (Tracking): This section is for advanced users who need to track data in an external system.
- Tracking template: Used to pass tracking parameters to your third-party analytics software (e.g., specific codes for identifying the source, campaign, and ad group).
- Final URL Suffix: Parameters added here are always attached to the end of your Final URL.
- Custom Parameter: Allows you to create your own unique parameters for granular tracking.
Step 7: Set Budget and Bidding
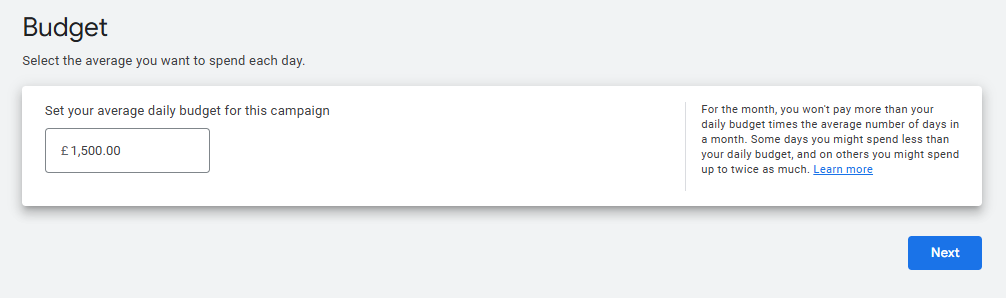
8. Budget: Enter your Average Daily Budget (in £).
- Stat: Google may spend up to 2x your daily budget on any given day, but will not exceed your monthly budget (which is your daily budget multiplied by the average number of days in a month, 30.4).
Step 8: Review and Publish
- Click Next to go to the Review page.
- Carefully check your Budget, Bidding, Locations, and Keywords.
- If everything looks correct, click Publish Campaign.
 Google Ads
 Search Engine Optimisation
 About Us