


Adding your business website to Google Search Console (GSC) is crucial. GSC is Google’s free tool that helps you monitor, maintain, and troubleshoot your site’s presence in Google Search results.
Step 1: Add the Property
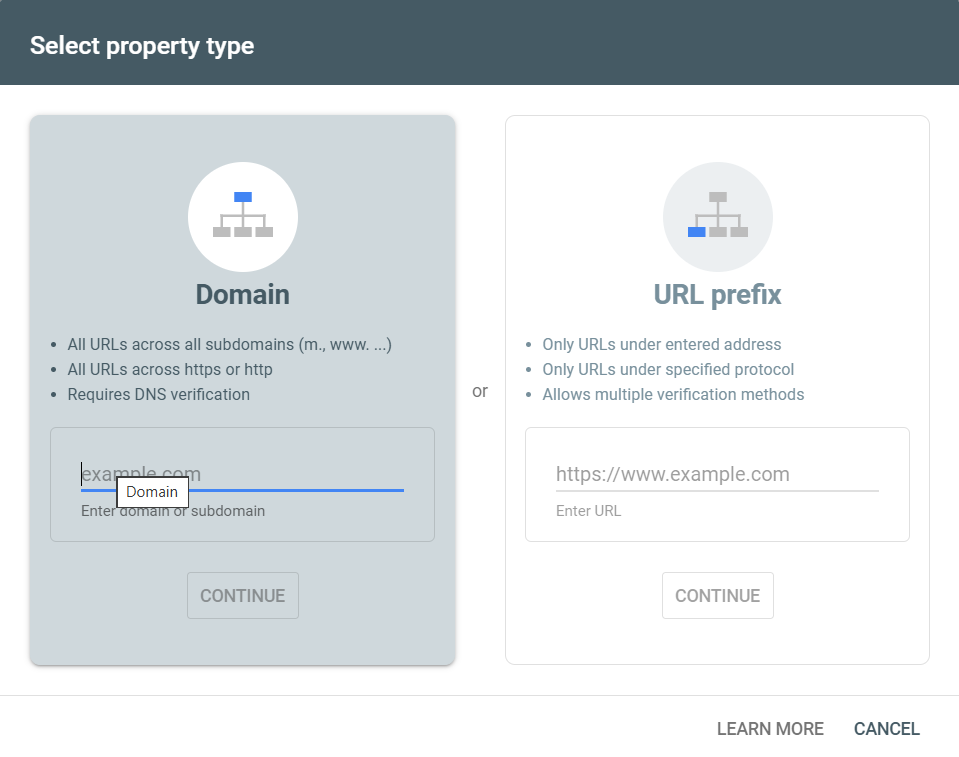
- Go to Search Console: Navigate to the Google Search Console website and sign in with your Google account.
- Add Property: If this is your first time, you’ll see a welcome screen. If you’ve used GSC before, click the Property selector dropdown in the top-left corner (it shows your current website) and select + Add property.
- Choose Property Type: You will be given two options for verification. The Domain option is the most comprehensive and recommended.
Option | What to Enter | Best Verification Method |
Domain (Recommended) | Enter your root domain only (e.g., https://utds.io/home/). | DNS record (verification code added to your domain registrar). |
URL prefix | Enter the full URL (e.g., https://utds.io/home/). | HTML file upload or HTML tag (code placed on the website). |
- Enter Your Domain: For the recommended Domain option, type in your domain name (without the http:// or www.) and click Continue.
Step 2: Verify Ownership (DNS Method)
The Domain verification method (using the DNS record) is preferred because it verifies all versions of your website (HTTP, HTTPS, WWW, non-WWW) at once.
- Get the TXT Record: A pop-up will display a unique TXT record (a long string of characters) that Google requires you to add to your domain settings. Click Copy.
- Log into Your Domain Registrar: Open a new browser tab and log into the account where you registered your domain name (e.g., GoDaddy, Namecheap, 123-reg, etc.).
- Find DNS Settings: Navigate to your DNS Management or DNS Settings area.
- Create a New TXT Record:
- Type/Record Type: Select TXT.
- Name/Host/Alias: Leave this field blank or enter the @ symbol.
- Value/Destination/Text: Paste the unique TXT record you copied from Google Search Console.
- TTL (Time To Live): Leave this as the default setting (or set it low, like 600 seconds/10 minutes).
- Save and Wait: Save the new record. DNS updates can take anywhere from a few minutes to 72 hours, but they are often quick.
- Final Verification: Go back to Google Search Console and click Verify. If the DNS has propagated (updated), you will see a “Ownership verified” success message.
Our Advice
1. Why Verification is Necessary
- Security: Verification proves to Google that you own the domain. This is essential because GSC provides sensitive data about your site’s performance, user queries, and any penalties.
2. Submit Your Sitemap
- Advise: Once verified, your first action in GSC should be to submit your sitemap.
- Action: In GSC’s left-hand menu, go to Sitemaps. Enter the URL of your sitemap (usually yourwebsite.co.uk/sitemap.xml) and click Submit. This tells Google all the pages you want them to crawl and index.
3. Link to Google Analytics
- Advise: While in GSC, click the Settings icon, then Associations. Link your GSC property to your Google Analytics 4 (GA4) property. This integration allows GSC data (like search queries and impressions) to appear directly inside your Google Analytics reports.

 Salesforce

