


Lead Assignment Rules automate the process of directing new leads to the right team members or queues based on specific criteria like geography, industry, or lead source.
Step 1: Creating the Assignment Rule Container
Salesforce allows multiple assignment rules, but only one can be “Active” at a time for each object.

- Navigate to Setup.
- In the Quick Find box, type Lead Assignment Rules.
- Click New.

- Enter a Rule Name (e.g., Standard_Lead_Routing).
- Check the Active box to ensure this rule runs for all new leads.
- Click Save.
Step 2: Defining Rule Entries (The Logic)
Once the rule is created, you must add “Rule Entries.” These are the individual instructions that tell Salesforce where to send the lead.
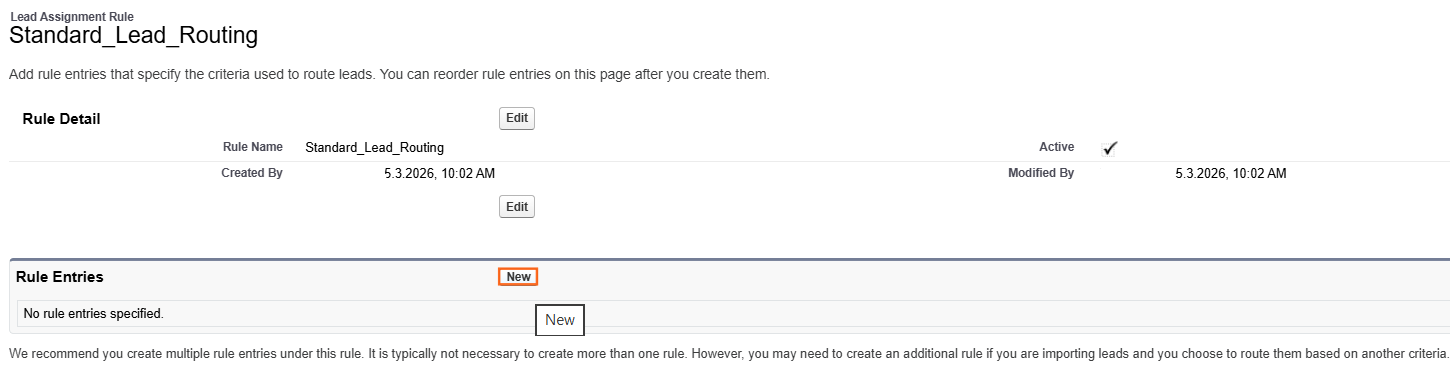
- Click on the Rule Name you just created.
- In the Rule Entries section, click New.
- Sort Order: Enter a number (e.g., 1). Salesforce processes entries in order until it finds a match.
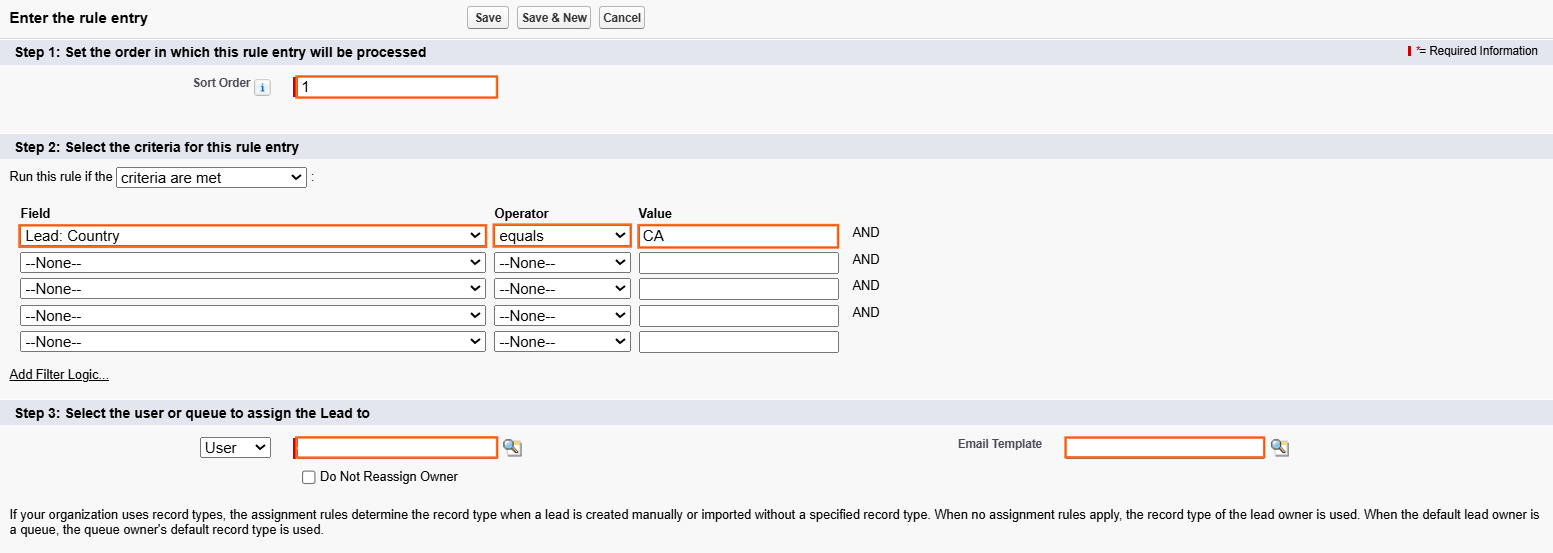
- Select Criteria: Choose “Field Content” and set your logic (e.g., Lead: State/Province EQUALS CA, NV, OR).
- Select User or Queue: Choose the user or the Lead Queue that should receive these leads.
- Email Template (Optional): Select a template to automatically notify the new owner.
- Click Save.
Step 3: Processing Order
It is important to understand how the Sort Order works in technical documentation. Salesforce evaluates the list from the top down:
Sort Order | Criteria | Assigned To |
1 | Country = “UK” | UK Sales Queue |
2 | Industry = “Tech” | Tech Specialist User |
3 | (No criteria) | General Catch-all Queue |
- If a Lead matches Entry 1, it stops there.
- If it doesn’t match 1 or 2, it falls to the “Catch-all” entry at the bottom. Always include a final entry with no criteria to ensure every lead has an owner.
Step 4: Triggering the Rule
For a lead to be assigned via these rules, the assignment must be triggered:
- Web-to-Lead: Leads coming from your website are assigned automatically by the active rule.
- Manual Entry: When a user creates a lead manually, they must check the “Assign using active assignment rule” checkbox at the bottom of the edit page.
- Data Import: When using the Data Import Wizard, you must select the option to “Use Assignment Rules.”
Step 5: Best Practices
- Use Queues: Instead of assigning leads to specific people, assign them to Queues. This allows team members to “claim” leads as they become available.
- Keep it Simple: Too many rule entries can make troubleshooting difficult. Group criteria where possible (e.g., use the INCLUDES operator for multiple states).
- Default Lead Owner: Ensure your “Lead Settings” have a Default Lead Owner designated in case no assignment rules are met.

 Salesforce

