


Connecting Salesforce to Google Ads is a critical step for closing the marketing loop. This integration allows UTDS Optimal Choice to send data about qualified leads and closed-won opportunities (conversions) from Salesforce directly back to Google Ads. This enables Google’s machine learning to optimise ad bids and campaigns based on real business value, not just clicks or form fills.
The official, optimal method for connecting is through the Google Ads Integration for Salesforce, available directly via the Google Ads interface.
Step 1: Prerequisites and Account Verification
Before connecting, ensure you meet the following requirements:
- Administrative Access: You must have Administrator access to the Salesforce Organisation and Administrator access to the Google Ads Account.
- Lead/Opportunity Tracking: Ensure your Salesforce is already tracking Lead Source and Opportunity Stage accurately, as this is the data that will be transferred.
- Active Google Ads Tag: Your Google Ads Conversion Tracking tag (the Global Site Tag and Event Snippet) must be active on your website.
Step 2: Initiate the Link via Data Manager (The Correct Path)
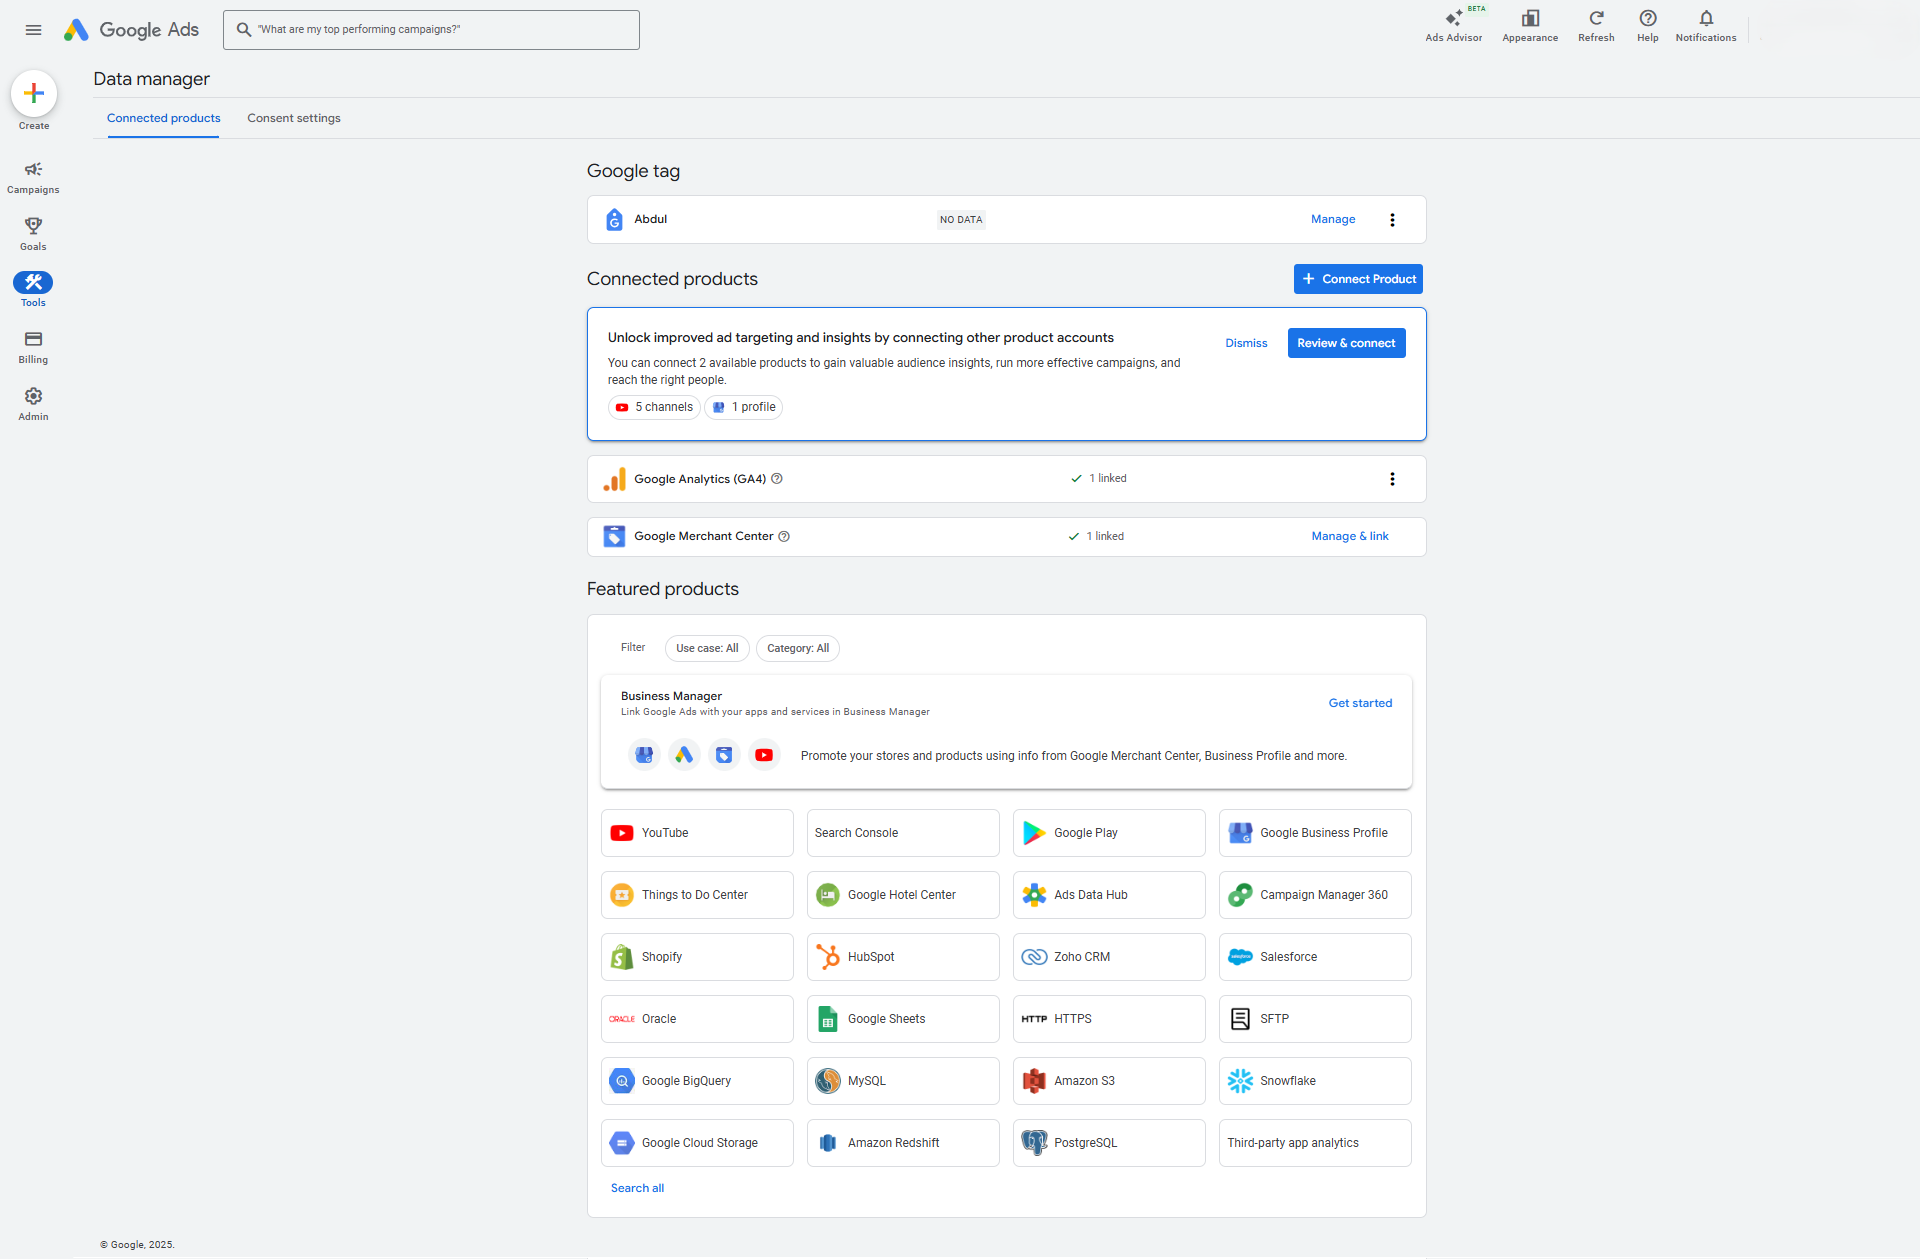
This is the central location for linking all external accounts, including Salesforce.
- Navigate to Tools: Log into your Google Ads account. Click the Tools in the left side menu.
- Access Data Manager: Click “Data manager”
- Connect Product: In the Data Manager, look for and click the “+ Connect Product”
- Select Salesforce: Search for or locate “Salesforce” in the list of available products and select the option for “Direct connection.”
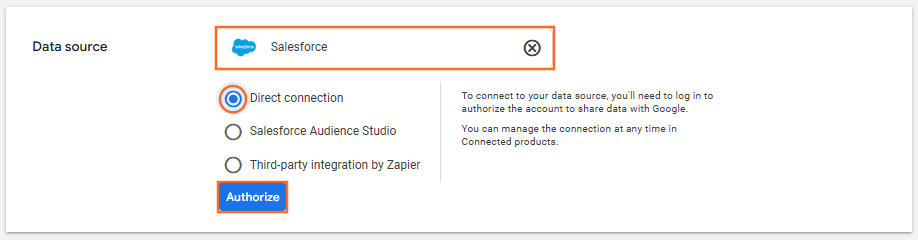
- Click “Authorize” to begin the external login process.
Note: Which Salesforce Product to Choose
Product Name | When to Choose It (Optimal Choice) |
Salesforce | Choose this option if your organization uses a standard enterprise edition (like Sales Cloud, Service Cloud, Professional, Enterprise, or Unlimited Edition). |
Salesforce Essentials | Only choose this if your organization specifically uses the Salesforce Essentials product, which is a legacy, limited edition designed for very small businesses. |
Step 3: Authorise and Map Salesforce Fields
This is where you authenticate the connection and tell Google Ads what Salesforce events should count as a conversion.
- Connect Account: Follow the prompts to sign in to your Salesforce production environment (or sandbox for testing). Google will use OAuth to confirm permissions.
- Define Conversion: You will be prompted to select the Salesforce objects and field values that represent a conversion:
- Leads: Select the Lead Status values that signify a qualified lead (e.g., “MQL” or “Qualified”).
- Opportunities (Optimal): Select the Opportunity Stage value that signifies a closed deal (e.g., “Closed Won”). This provides the most valuable feedback to Google.
- Map Fields: Google Ads requires mapping specific Lead or Contact fields (usually Email Address) to the Customer Data that was captured by your website forms. This allows Google to match the user who saw the ad to the record in Salesforce.
Step 4: Finalise and Data Flow
Once connected, Google Ads automatically creates custom fields in Salesforce (if needed) and initiates a Conversion Import Schedule.
- Scheduled Updates: The data sync is typically scheduled to run daily (or multiple times per day).
- Optimisation: Google Ads now receives a constant feed of real-world conversion data (qualified Leads and Closed Won Opportunities). The system can now attribute your highest-value sales back to the specific Keyword, Ad, and Campaign that generated the initial click.
- Actionable Result: Your ad account can now use Smart Bidding strategies (like Target CPA or Maximise Conversion Value) to bid higher on clicks that are statistically more likely to become a Closed Won deal in Salesforce, dramatically improving your ROI.

 Salesforce

